Collage
Summary: We consider ways in which to make images that are composed of other images and parts of other images. Along the way, we explore some of the lower-level GIMP procedures upon which gigls relies.
Introduction
We’ve started to see that we can think of image making in many different ways. For example,
- we can describe an image as a grid of colors, using
color-grid; - we can describe an image in terms of another image and a simple transformation on that image, using
image-variant; - we can describe an image as a collection of basic shapes, using the “drawings as values” model; and
- we can describe an image by the series of actions you would use in the GIMP to build that image, using the GIMP tools model.
There are, of course, many other models of image making. In this section, we consider collage, a model of image making that relies on taking parts of other images and putting them together into a coherent (or semi-coherent) whole. Collage has regularly been used in a wide variety of situations, from kindergarten masterpieces to Warholesque pop art. It should therefore be part of your own toolbox.
Computers are certainly a natural domain for collage. The “cut”, “copy”, and “paste” operations are part of every modern computer application. We will consider the particulars of using these operations in Mediascheme.
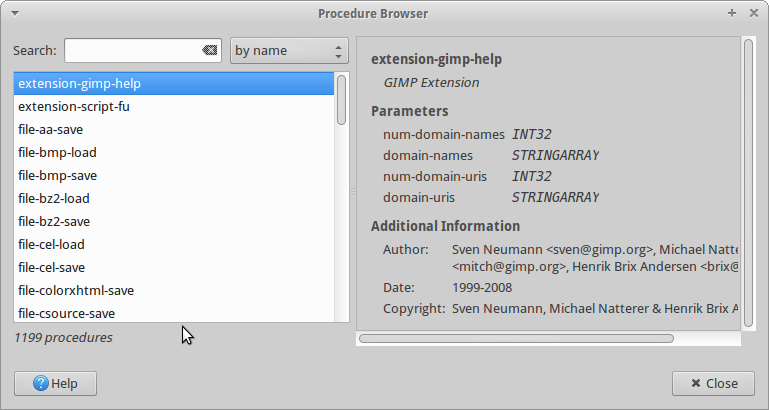
Detour: The Gimp Procedural Database
Unfortunately, the designers of Mediascheme and gigls neglected to include copy and paste operations. Fortunately, Mediascheme and gigls are built upon a lower-level library, the Gimp Procedural Database, or PDB. (Mediascheme and gigls also depend on some other custom code, but a wide variety of operations are just nicer interfaces to PDB operations.) You can get a list of all of the PDB operations by selecting “Procedure Browser” from under the “Help” menu. You will then see a window that presents a list of procedure names. When you click on one, you will get documentation.
If we type “copy” in the search box, we see that there are nine procedures that relate to copying.
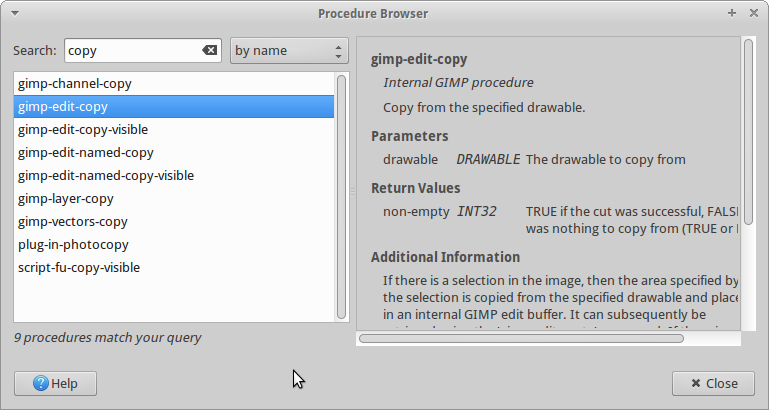
The two most relevant procedure are gimp-edit-copy and
gimp-edit-copy-visible. The former takes a “drawable” as a
parameter, the latter takes an image. What’s a drawable? For those
of you who have used graphics programs before, it’s easiest to think
of “drawable” as being another word for “layer”, but it’s really a
class of things that include layers. If you’ve never used a graphics
programs before, layers can be thought of a stack of possible-transparent
sheets that you stack on top of each other to make an image. In
most cases, it will suffice to use gimp-edit-copy-visible, but
it helps to know that other options are available.
Copying and Pasting
We now know how to find out what procedures GIMP makes available and have started to figure out how to read them. Let’s play with copying and pasting. We’ll copy a portion of our favorite image.
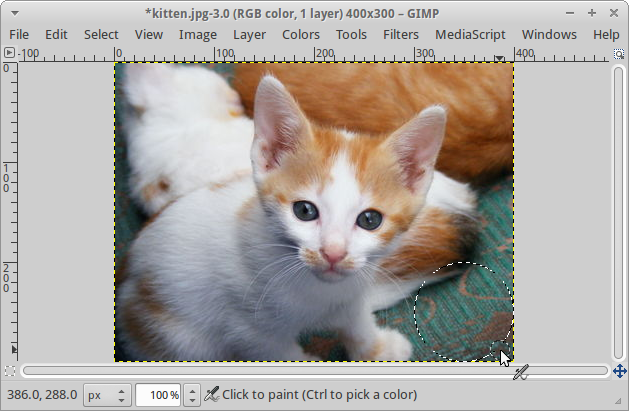
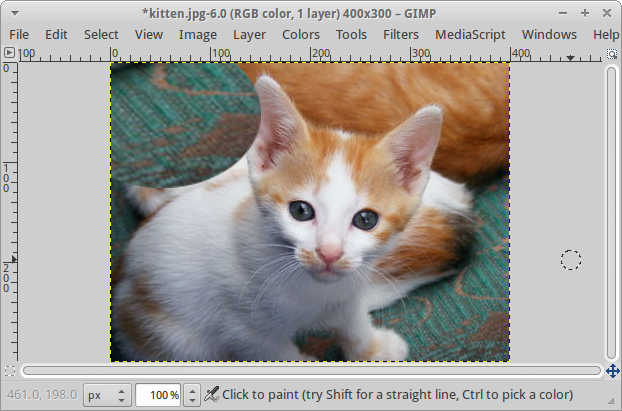
> (define kitten (image-show (image-load "/home/rebelsky/Desktop/kitten.jpg")))"
> (image-select-ellipse! kitten REPLACE 300 200 100 100)
3
> (gimp-edit-copy-visible kitten)
'(1)
Here’s what the screen looks like so far.
Both gimp-edit-copy and gimp-edit-copy-visible say that you can
paste the copied selection with gimp-edit-paste. What does
gimp-edit-paste take as parameters? The documentation says that
we need to provide a “drawable” and an integer. As we noted above,
the drawable is just the layer, which we can get with image-get-layer.
The integer will normally be 1, which means “paste over whatever
was there before”.
So, let’s try pasting.
> (image-select-ellipse! kitten REPLACE 0 0 100 100)
3
> (gimp-edit-paste (image-get-layer kitten) 1)
'(12)
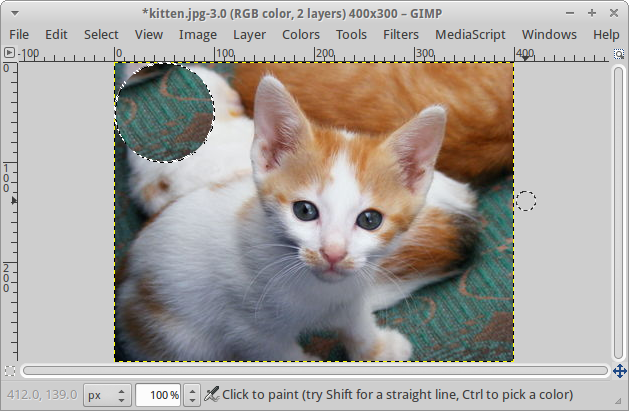
What’s the '(12) that was returned? It’s a list containing
a drawable that corresponds to the newly pasted stuff. Why do we get
a drawable? It’s a long story. Suffice to say that it allows us to
do some cool things, but makes our life a little bit more difficult.
Believe it or not, but the drawable is not yet “stuck” on the image yet. We need to eliminate our selection. We also need to “flatten” the drawable, which we do with the following instructions.
> (image-select-nothing! kitten)
3
> (gimp-image-flatten kitten)
'(22)
The '(22) at the end says that the one layer in
kitten is identified as layer 22. (Yeah, GIMP likes
to number everything, and the numbers aren’t always obvious.)
Scaling Selections
While we’ve succeeded at copying and pasting, it feels like we should be able to do some more creative variations. We did note above that once you have a drawable, you can do some interesting other things with it. One possibility, as the title of this section suggests, is that you can scale a selection, making it larger or smaller.
How do you scale a selection? With the gimp-layer-scale
procedure, which takes four parameters: the layer you want to scale,
the new width you want, the new height you want, and a number to indicate
what the scaling is around. (We normally use 1 to scale around
the center of the selection.
Here’s a series of operations that produce a similar image to above, but with the pasted carpet scaled horizontally by 200% and vertically by 150%.
> (define kitten (image-show (image-load "/home/rebelsky/Desktop/kitten.jpg")))
> (image-select-ellipse! kitten REPLACE 300 200 100 100)
6
> (gimp-edit-copy-visible kitten)
'(1)
> (image-select-ellipse! kitten REPLACE 0 0 100 100)
6
> (gimp-edit-paste (image-get-layer kitten) 1)
'(38)
> (image-select-nothing! kitten)
6
> (gimp-layer-scale 38 200 150 1)
'()
> (gimp-image-flatten kitten)
'(39)
Here’s the image that results.
Rotating Selections
What else can we do? We can rotate selections that we’ve pasted using
gimp-item-tranform-rotate, which takes five parameters.
The first parameter is the identifier associated with the pasted
image. The second parameter is the angle we want to rotate the selection.
It’s easiest to use 1 0 0 for the other three parameters,
but you can read the documentation for more information.
(define kitten (image-show (image-load “/home/rebelsky/Desktop/kitten.jpg”))) (image-select-ellipse! kitten REPLACE 100 100 200 100) 7 (gimp-edit-copy-visible kitten) ‘(1) (gimp-edit-paste (image-get-layer kitten) 1) ‘(43) (image-select-nothing! kitten) 7 (gimp-layer-scale 43 150 75 1) ‘() (gimp-item-transform-rotate 43 45 1 0 0) (gimp-image-flatten kitten) ‘(44) ```
We’ll let you imagine what image results. (You should also try running the code yourself.)
Important Steps
Here’s the normal list of steps for copying and pasting.
- Select the area you want to copy in the source image.
- Call
(gimp-edit-copy-visiblesource), wheresourceis the number that identifies the source image. - Select the area you want want to paste into in the target image. (We’ve used the same image for the source and the target, but you can use separate images.)
- Call
(gimp-edit-paste (image-get-layer target) 1)wheretargetis the number that identifies the target image. - Take note of the number that is returned. You can do so manually,
or you can write code that does so.
(define pasted (car (gimp-edit-paste (image-get-layer target) 1))) - Call
(image-select-nothing! target)to make sure nothing is currently selected. - Transform the pasted material as appropriate with
gimp-layer-scale,gimp-item-transform-rotate, and other related procedures. - Call
(gimp-image-flattentarget).
Self Checks
Check 1: Verify Functionality
Toward the beginning of this reading, we showed you a series of steps that copied a circle from the lower-right corner of an image to the upper-left corner.
a. Replicate those steps and see if you get the same general results. (You will likely get different numbers for the image and the layers.)
b. Try the steps using different starting and ending positions.
Check 2: Checking Rotations
a. Predict the results of the example in the section on rotating selections.
b. Check your answer experimentally.
Check 3: More Sophisiticated Rotations
Read the PDB documentation for gimp-item-transform-rotate
and determine what the last three parameters really represent.