Assignment 7: Turtles and iteration
Due: Tuesday, April 11 by 10:30pm
Summary: In this assignment, you will use turtles to create images using iteration, recursion, and a mix of both techniques.
Purposes: To give you more experience with the turtle model. To give you more comfort with anonymous procedures. To explore the complexities possible from simple operations.
Collaboration: You may work alone or in groups of two or three students. You may choose your own partners.
Submitting: Send your answer to csc151-01-grader@grinnell.edu. The title of your email should have the form [CSC 151.01] Assignment 7 and should contain your answers to all parts of the assignment. I prefer that you put your answers in the body of the message, rather than as an attachment.
So that this assignment is a learning experience for everyone, we may spend class time publicly critiquing your work.
Problem 1: Drawing Polygons
Topics: turtle graphics, iteration
Document and write a procedure, (turtle-polygon! turtle side-length
sides), that uses a turtle to draw a regular polygon with the
specified number of sides, with each side of the specified length.
Important: Your procedure must return the turtle to its original position and angle. Your procedure must not change the turtle’s brush or color.
Hint: Use repeat. The turtle must turn a total of 360 degrees
to return to its original angle.
For example,
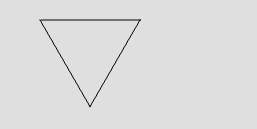
(turtle-polygon! t 100 3)

(turtle-polygon! t 100 4)

(turtle-polygon! t 60 5)

(turtle-polygon! t 40 6)
Problem 2: Drawing Snowflakes
Topics: turtle graphics, iteration, recursion
Document and write a procedure, (turtle-snowflake! turtle
side-length sides depth), that recursively draws a polygon
with smaller polyings on the outside of each corner on the first
polygin, even smaller polygons at the corners of the smaller polygons,
and so on for depth levels.
Each successive level should have a side length that is 40% that
of the previous level.
For example: the following call draws an inner square with edges of length 100, then at each corner places an additional square with edges of length 40.
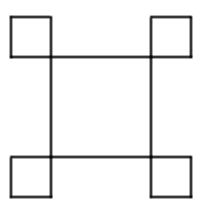
(turtle-snowflake! t 100 4 2)
If we change the last parameter to 4, our procedure draws the same two-level image as the previous example, but adds two more levels. That is, each 40x40 square has a 16x16 (40% x 40 = 16) square at each corner, and each 16x16 square has a 6.4x6.4 square at each corner.
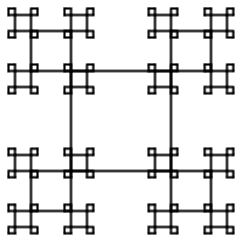
(turtle-snowflake! t 100 4 4)
If we use 5 for the number of sides and 2 for the number of levels, we get a pentagon with edges that are 100 pixels long and a smaller pentagon at each corner.
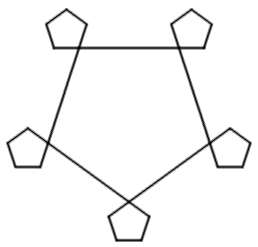
(turtle-snowflake! t 100 5 2)
If we increase the level to 4, we may see why the procedure is called
turtle-snowflake!.
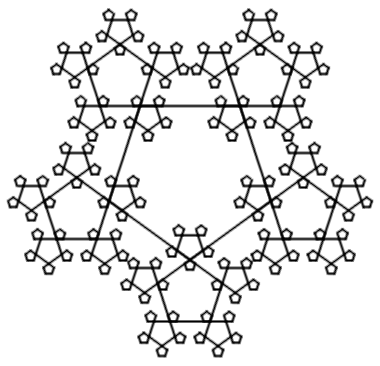
(turtle-snowflake! t 100 5 4)
The edge lengths in this example are 100, 40, 16, and 6.4.
Of course, not every result will be as nice. If we increase the number of sides to 6, we may see some unexpected overlap.
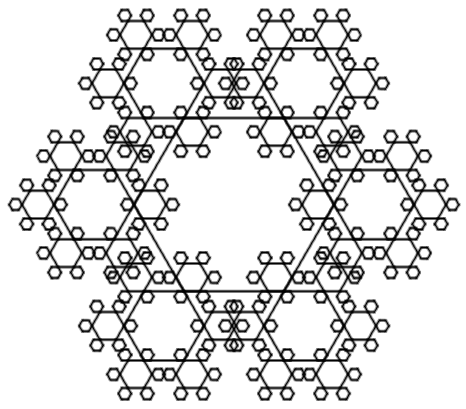
(turtle-snowflake! t 100 6 4)
While you can certainly have more than six edges or more than four levels, the drawing will take quite a while to finish.
Note: Your turtle-polygon! procedure may be a useful starting point,
but you probably won’t be able to use it directly in your implementation
of turtle-snowflake!. You may find it useful to mix iteration
and recursion: use iteration to draw each side of a polygon, and
recursion to draw each level.
Problem 3: Turtle Trees
Topics: basic recursion, numeric recursion, turtle graphics, Documentation
Write and document a procedure, (turtle-tree! turtle trunk-length
branching-factors), that takes three parameters: a
turtle, a positive integer, and a list of integers between 2 and
- Your procedure should use the provided
turtleto draw a tree. You can think of a tree as a trunk (a line) with some number of smaller trees “growing” out of the end of the trunk.
To draw a tree with a particular trunk length, your turtle should
first move forward by the trunk length. You should then take the
first element of branching-factors and recursively draw that many
slightly smaller trees at that point, spaced evenly from -45 degrees
to 45 degrees. A factor of 75% for the new branch length tends to
work well.
Here are some simple examples.

(turtle-tree! (set-up-turtle) 80 null)
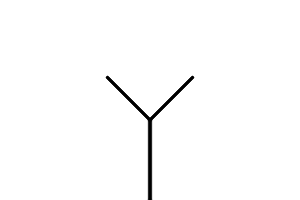
(turtle-tree! (set-up-turtle) 80 (list 2))

(turtle-tree! (set-up-turtle) 80 (list 3))
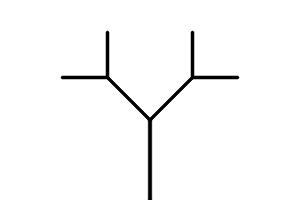
(turtle-tree! (set-up-turtle) 80 (list 2 2))
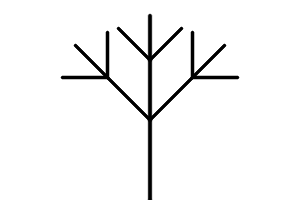
(turtle-tree! (set-up-turtle) 80 (list 3 3))
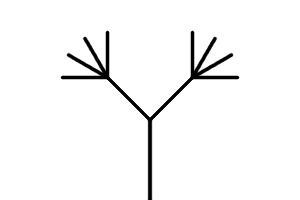
(turtle-tree! (set-up-turtle) 80 (list 2 4))
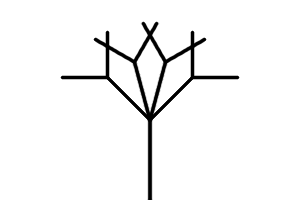
(turtle-tree! (set-up-turtle) 80 (list 4 2))
As these examples suggest, drawing a tree, some set-up is required:
; Create a world, a turtle, set the brush to a fine line, and position the turtle
; at the bottom middle of the image facing up.
(define set-up-turtle
  (lambda ()
    (let* ([world (image-show (image-new 300 200))]
           [tommy (turtle-new world)])
      (turtle-turn! tommy -90)
      (turtle-teleport! tommy 150 200)
      (turtle-set-brush! tommy "2. Hardness 100" 0.15)
      tommy)))
After running the set-up code above, you should be able to run the prior examples with a completed turtle-tree! function. You should, of course, try other examples, too.