Assignment 6: Recursive Images
Due: 10:30 p.m., 3 November 2015
Summary: In this assignment, you will experiment with a number of approaches for recursively making and modifying images, primarily using the GIMP tools to make these images.
Purposes: To give you more experience with recursion. To give you an opportunity to play with interesting images.
The technique for making this drawings is based on the idea of string art.Collaboration: We encourage you to work in groups of size two. You may, however, work alone or in a group of size three. You may discuss this assignment with anyone, provided you credit such discussions when you submit the assignment.
Submitting:
Email your answer to <grader-151-01@cs.grinnell.edu>. The title of your
email should have the form CSC 151.01 Assignment 6: Recursive Images
and should contain your answers to all parts of the assignment.
Scheme code should be in the body of the message. Do not
attach any images. We should be able to regenerate any
images you create just from the instructions you submit.
Warning: So that this assignment is a learning experience for everyone, I may spend class time publicly critiquing your work.
Part A: String Art
Many of you may have played with string art when you were growing up. In this technique, colored string is wrapped around pegs or notches on a board to produce geometric or other figures that give the illusion of curves, even though the string is pulled in straight lines. Our goal here is to simulate this technique using Scheme procedures.
In string art, the endpoints of the individual lines form the edges of
the figure. We will limit ourselves (at first) to drawing figures whose
edges are horizontal and vertical lines, that is, rows and columns.
We will allow the user to specify n, the number
of lines that are drawn, and use numeric recursion to draw them.
The user should also be able to specify the position and size of the
figure; we do this with four parameters: edge-col
and edge-row, along which the ends of
the lines will fall, and the width and
height of the figure.
Read the following procedure.
Ask yourself the following questions.
;;; Procedure:
;;;   image-string-art!
;;; Parameters:
;;;   image, an image
;;;   n, a positive integer
;;;   edge-col, an integer
;;;   edge-row, an integer
;;;   width, an integer
;;;   height, an integer
;;; Purpose:
;;;   Draw a "string art" figure.
;;; Produces:
;;;   [Nothing.  Called for its side effects.]
;;; Preconditions:
;;;   [No additional.]
;;; Postconditions:
;;;   n lines have been drawn.
;;;   The lines have endpoints falling along
;;;     edge-col and edge-row.
;;;   The lines are evenly spaced.
;;;   The lines cross each other.
;;;   The figure is bounded by the rectangle
;;;     (edge-col, edge-row)
;;;     (edge-col + width, edge-row + height)
(define image-string-art!
  (lambda (image n edge-col edge-row width height)
    (let ([col-spacing (/ width (- n 1))]
          [row-spacing (/ height (- n 1))])
      (let kernel ([i 0]
                   [col edge-col]
                   [row (+ edge-row height)])
        (when (< i n)
          ; The next two lines are for testing
          ; (print (list 'from (list edge-col row) 'to (list col edge-row)))
          ; (newline)
          (image-draw-line! image
                            edge-col row
                            col edge-row)
          ;(context-update-displays!) ; for debugging
          (kernel (+ i 1)
                  (+ col col-spacing)
                  (- row row-spacing)))))))
- What is the base case?
- What is the simplification step?
- How are the two endpoints of each line computed?
Now, let's try the procedure out.
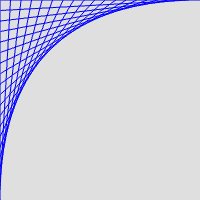
>(define canvas (image-new 200 200))>(image-show canvas)>(context-set-fgcolor! "blue")>(context-set-brush! "2. Hardness 100" 0.15)>(image-string-art! canvas 20 0 0 200 200)>(context-update-displays!)
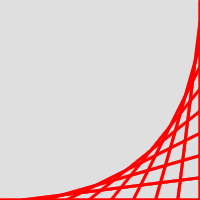
We can also change where the lines are drawing.
>(define canvas (image-new 200 200))>(image-show canvas)>(context-set-fgcolor! "red")>(context-set-brush! "2. Hardness 100" 0.25)>(image-string-art! canvas 10 200 200 -200 -200)
To help you understand how the procedure works, uncomment the lines marked with comments as “for debugging”. Then try the above example again. You should be able to see the lines being drawn one by one.
Now, let's think about how to vary the parameters to the
image-string-art! procedure.
For each of the following,
first consider what you think will happen when we make the change and
then check your answer experimentally. In each case, assume that the
change is from the original call to image-string-art!.
You will want to clear the image or change the foreground color
after each experiment so that you can see what changed.
- What will happen if we change the edge column to a number that is between 0 and the width?
- What will happen if we change the width to 25 and the height to 200?
- What will happen if we use different signs for width and height?
-
What will happen if we change
nto 50? to 5?
Problem A.1: Replicating Figures
Give a set of instructions for replicating each of the following
figures, each of which is on a 200x200 image.
(You should be able to make the figures with appropriate calls
to image-string-art!.)
Note: You do not need to worry about the precise number of lines in each figure. The general shape (and color) should be the same, but with (very) roughly the same number of lines used.
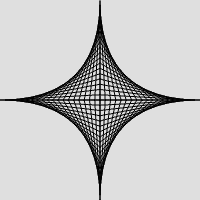 Figure 1a.
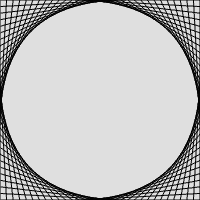 Figure 1b.
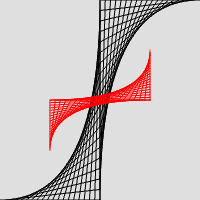 Figure 1c.
Problem A.2: More Interesting String Art
Write your own variant or variants of
image-string-art! that provide some changes in
the way the string art is made. While you need not include all of
the following in each of your variants, you must demonstrate each
technique at least once.
-
Vary the color of each line drawn based on the iteration (that is,
the value of
i). - Vary the brush used to draw the line, (e.g., cycling from smaller to larger to smaller to larger to smaller ...)
- Vary the lengths of the lines.
- Use a systematic, but not constant, spacing between endpoints.
We strongly recommend that you get some simple variations working before trying something more complicated. Think about how you can make (and check!) your changes in small steps.
Include the instructions for generating image(s) that demonstrate all the techniques above.
Part B: The Nearest Color
We've seen in the past that a simple metric for the “distance” between two colors is the sum of the squares of the differences between their individual components.
;;; Procedure:
;;;   irgb-distance
;;; Parameters:
;;;   color1, an integer-encoded RGB color
;;;   color2, an integer-encoded RGB color
;;; Purpose:
;;;   Find the distance between color1 and color2, using some simple
;;;   metric for distance.
;;; Produces:
;;;   distance, a non-negative real number
;;; Preconditions:
;;;   [No additional]
;;; Postconditions:
;;;   If color1=color2, then distance is 0
;;;   For any three colors, a, b, and c, if
;;;     (irgb-distance a b) < (irgb-distance b c)
;;;   then a is likely to be perceived as being closer to b than c.
;;; Plus:
;;;   irgb-distance is commutative.  That is, for any two colors, a and b,
;;;     (irgb-distance a b) = (irgb-distance b a)
(define irgb-distance
  (lambda (color1 color2)
    (+ (square (- (irgb-red color1) (irgb-red color2)))
       (square (- (irgb-green color1) (irgb-green color2)))
       (square (- (irgb-blue color1) (irgb-blue color2))))))
Once we have such a metric, it's reasonable to ask which color in a list is “closest” to a target color. (That is, which color has the least distance to color.) Here's documentation for such a procedure.
;;; Procedure:
;;;   irgb-closest
;;; Parameters:
;;;   color, an integer-encoded RGB color
;;;   colors, a non-empty list of integer-encoded RGB colors
;;; Purpose:
;;;   Find the element of colors that is "closest" to color.
;;; Produces:
;;;   closest, an integer-encoded RGB color
;;; Preconditions:
;;;   [No additional]
;;; Postconditions:
;;;   closest is a member of colors.
;;;   For all colors, c, in colors
;;;     (irgb-distrance color closest) <= (irgb-distance color c)
Implement irgb-closest
Here's an example.
>(define samples (list (irgb 0 0 0) (irgb 128 0 0) (irgb 128 0 128) (irgb 255 0 255)))>(irgb->string (irgb-closest (irgb 64 64 64) samples))"0/0/0">(irgb->string (irgb-closest (irgb 95 95 140) samples))"128/0/128">(irgb->string (irgb-closest (irgb 200 20 190) samples))"255/0/255"
We can also use this procedure as a filter.
> (define limited-color
    (r-s irgb-closest (map color->irgb
                           (list "red" "yellow" "green" "blue" "black" "white"
                                 "violet" "lime" "snow"))))
> (image-show (image-variant (image-load "/home/rebelsky/Desktop/kitten.jpg")
                             limited-color))

Part C: Simplifying Images
As you may know, one of the ways that some image file formats “compress” images is to find regions of identical or nearly identical colors, and represent them as a single color (or as a single color plus small deviations from that color). That approach also makes an interesting image filter.
Implement the following procedure.
;;; Procedure:
;;;   region-simplify!
;;; Parameters:
;;;   image, an image
;;;   distance, a positive integer
;;;   left, a non-negative integer
;;;   top, a non-negative integer
;;;   width, a positive integer
;;;   height, a positive integer
;;; Purpose:
;;;   Attempt to simplify the specified region of the image by replacing
;;;   areas of similar pixels with a single color.
;;; Produces:
;;;   [Nothing; called for the side effect]
;;; Preconditions:
;;;   0 <= left < (image-width image)
;;;   0 <= top < (image-height image)
;;;   (+ left width) <= (image-width image)
;;;   (+ top height) <= (image-height image)
;;; Postconditions:
;;;   [See process for details]
;;; Process:
;;;   If the region is small enough (width or height < 3),
;;;     Replace the region with the average of four samples.
;;;   Otherwise
;;;     Sample four colors from the region.
;;;     If no pair of colors is more than distance apart, replace
;;;       the region with the average of the four colors.
;;;     Otherwise
;;;       Split the region into two halves (sometimes vertically,
;;;         sometimes horizontally)
;;;       Repeat the process on each half
You'll find it easiest to apply this procedure using the following procedure.
;;; Procedure:
;;;   image-simplify!
;;; Parameters:
;;;   image, an image
;;;   distance, a positive integer
;;; Purpose:
;;;   Simplify the image by replacing blocks of pixels with a single
;;;   color when the pixels are sufficiently close
;;; Produces:
;;;   [Nothing; called for the side effects]
(define image-simplify!
  (lambda (image distance)
    (region-simplify! image distance
                      0 0
                      (image-width image) (image-height image))))
Here are some examples with our favorite kitten image. In this case, we've randomly selected whether to split horizontally or vertically.
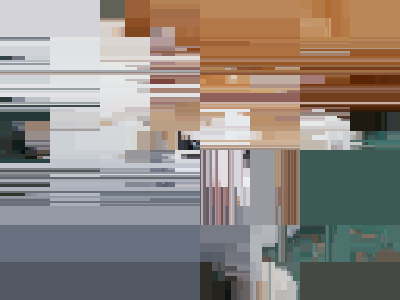 |
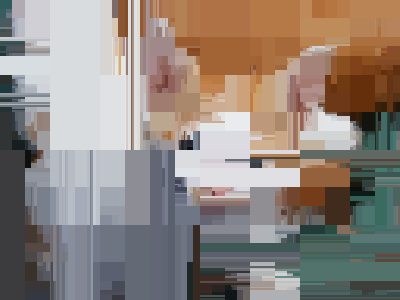 |
We have changed the number of samples used. Ideally, you would use four samples in each of the cases. But if you use three or five (except for the primary sampling, which must be at least four), the grader will not grade you differently.
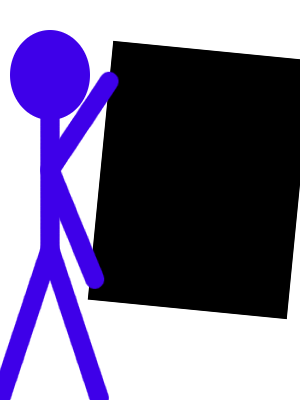
Part D: Self-Recursive Images
There is a genre of images that we like to call “self-recursive photographs”. Typically, somewhere in the image there is another image (e.g., a book cover or a painting or ...). And that image looks like the original. And, somewhere in that inner image is another image. And so on and so forth. Here's an example, showing both the original picture and the recusive version.
 |
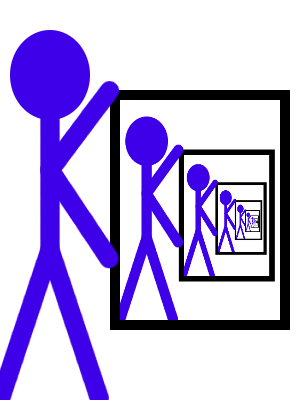 |
Of course, that version is straightforward because the alignment of the “painting” is the same as the alignment of the picture. Many such iimages rotate the painting slightly, as in the following.
 |
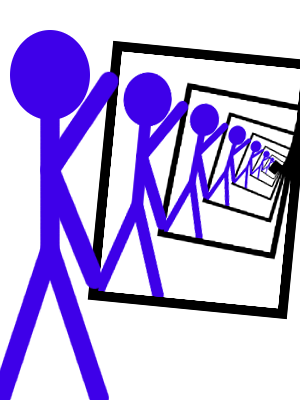 |
Document and write a procedure, (,
that takes a basic image and makes it self-recursive, using the
specified number of levels of recursion. You will need to figure
out the appropriate parameters to supply so that it can be used for
a variety of original images.
self-recursive
image levels ...)
You will find the following procedures helpful. (You need not understand how they work, just what they do.)
;;; Procedure:
;;;   image-copy-paste!
;;; Parameters:
;;;   image, an image
;;;   source-left, a non-negative integer
;;;   source-top, a non-negative integer
;;;   source-width, a positive integer
;;;   source-height, a positive integer
;;;   target-left, a non-negative integer
;;;   target-top, a non-negative integer
;;;   target-width, a positive integer
;;;   target-height, a positive integer
;;; Purpose:
;;;   Copy one rectangular region of the image to another, resizing.
;;;   as necessary.
;;; Produces:
;;;   [Nothing; called for the side effect]
;;; Preconditions:
;;;   0 <= source-left < (image-width image)
;;;   0 <= source-top < (image-height image)
;;;   (+ source-left source-width) < (image-width image)
;;;   (+ source-top source-height) < (image-height image)
;;;   0 <= target-left < (image-width image)
;;;   0 <= target-top < (image-height image)
;;;   (+ target-left target-width) < (image-width image)
;;;   (+ target-top target-height) < (image-height image)
;;; Postconditions:
;;;   The specified area of the image now contains the same subimage
;;;   as the source area (scaled, as appropriate).
(define image-copy-paste!
  (lambda (image
           source-left source-top source-width source-height
           target-left target-top target-width target-height)
    (let ([layer (image-get-layer image)])
      (image-select-rectangle! image REPLACE
                               source-left source-top
                               source-width source-height)
      (gimp-edit-copy layer)
      (image-select-rectangle! image REPLACE
                               target-left target-top
                               target-width target-height)
      (let ([pasted (car (gimp-edit-paste layer 1))])
        (image-select-nothing! image)
        (gimp-layer-scale pasted target-width target-height 1)
        (gimp-image-flatten image)
        image))))

;;; Procedure:
;;;   image-copy-paste-rotate!
;;; Parameters:
;;;   image, an image
;;;   angle, a real number
;;;   source-left, a non-negative integer
;;;   source-top, a non-negative integer
;;;   source-width, a positive integer
;;;   source-height, a positive integer
;;;   target-left, a non-negative integer
;;;   target-top, a non-negative integer
;;;   target-width, a positive integer
;;;   target-height, a positive integer
;;; Purpose:
;;;   Copy one rectangular region of the image to another, resizing
;;;   to the target size and then rotating by angle radians.
;;; Produces:
;;;   [Nothing; called for the side effect]
;;; Preconditions:
;;;   0 <= source-left < (image-width image)
;;;   0 <= source-top < (image-height image)
;;;   (+ source-left source-width) < (image-width image)
;;;   (+ source-top source-height) < (image-height image)
;;;   0 <= target-left < (image-width image)
;;;   0 <= target-top < (image-height image)
;;;   (+ target-left target-width) < (image-width image)
;;;   (+ target-top target-height) < (image-height image)
(define image-copy-paste-rotate!
  (lambda (image angle
           source-left source-top source-width source-height
           target-left target-top target-width target-height)
    (let ([layer (image-get-layer image)])
      (image-select-rectangle! image REPLACE
                               source-left source-top
                               source-width source-height)
      (gimp-edit-copy layer)
      (image-select-rectangle! image REPLACE
                               target-left target-top
                               target-width target-height)
      (let ([pasted (car (gimp-edit-paste layer 1))])
        (image-select-nothing! image)
        (gimp-layer-scale pasted target-width target-height 1)
        (gimp-item-transform-rotate pasted angle 1 0 0)
        (gimp-image-flatten image)
        image))))
Important Evaluation Criteria
As is our custom, we will evaluate you on correctness, clarity, concision, and, where appropriate, creativity.
Citations
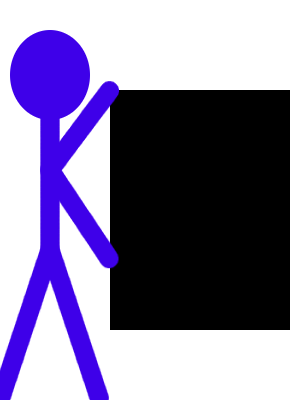
The mediocre images of a stick figure holding a rectangle were generated by programs written by Samuel A. Rebelsky and are released under a Creative Commons 4.0 Attribute License.
The photograph of the kitten was released for public use at
http://public-photo.net/displayimage-2485.html.
It appears that site is now down.