Lab: Image and algorithmic decomposition
- Assigned
- Wednesday, 1 September 2021
- Summary
- In this laboratory, you will practice algorithmic decomposition by analyzing and writing code to draw basic pictures in Racket.
In the reading, we introduced the foundational technique of algorithmic decomposition where we express a complex problem in terms of smaller, easier-to-solve problems. We can decompose any problem, no matter the domain. However, the image-drawing facilities of Racket give us a natural way of visualizing decomposition. We will, therefore, begin our journey into programming by practicing algorithmic decomposition with images. This lab will give you some experience decomposing problems as well as typing out basic Racket code.
Exercises
Introducing Pair Programming
For these next four exercises, we will try out pair programming. Pair programming is a particular discipline of collaborative programming that we will be using extensively in our lab work. We’ll have more to say in the coming weeks about the nitty-gritty of working in pairs, but we would like you to dive head-first into the experience.
- One person, the driver, will be in control of keyboard.
They will often take the lead on designing and coding a solution, speaking aloud about their design thoughts as they work. - The other person, the navigator, helps keep them from going too far off track. They observe and consider strategic design issues. They look for potential problems and raise them with the driver. If they happen to have a separate computer, they can serve as a resource to look things up, such as the syntax of an operation. They try to keep track of time.
Between each exercise, you will swap driver and navigator roles so that you and your partner get experience with both roles. If you are in a group of three, you will have two navigators and one driver! Make sure to rotate roles so that everyone gets a turn as the driver.
To encourage appropriate swapping, we have labeled each problem as “A” and “B” for pairs. Whoever arrived first is partner “A” Whoever arrived second is partner “B”. A and B drive as appropriate. If there is a third partner, ignore the labels and rotate appropriately.
You should begin by copying and opening the file decomposition.rkt (click on it) which contains spaces to answer the instructions you will find here. In future labs, the file may contain instructions, code, and places to enter your answers.
If you find that your partner is not behaving as they should (e.g., dominating or leeching), please speak with a member of the course staff.
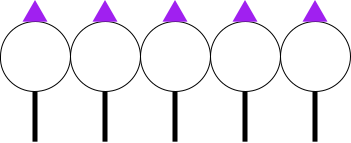
Exercise 1: Party
(A-side: Spend 10 minutes working collaboratively on this problem.)
Your pair should work on defining an image called party-people that looks like this:
 .
.
To draw equilateral triangles use the triangle function, e.g.,
; Creates an equilateral triangle with sides of length
; 10 (in pixels) that is solid and green.
(triangle 10 'solid "green")
Like the reading, use the technique of algorithmic decomposition to break down the image into smaller parts that are simpler to implement.
Your code should use define commands to explicitly name these smaller parts so that your code reflects that decomposition you identified.
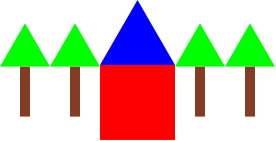
Exercise 2: Cottage
(B-side: spend 15 minutes working collaboratively on this problem.)
Now, switch roles!
The navigator of the previous problem should become the driver.
They should share their screen and the exercise will be written in their decomposition-b.rkt file.
Now, try building a program that defines cottage as the following image:
 .
.
Again:
- Use algorithmic decomposition to break down this image into smaller parts, using
defines to explicitly name the smaller parts you identified. - When you are done, notify the course staff using the
@stafftag and share your results from exercises 2 and 3.
Exercise 3: Falling dominoes
(A-side: Spend 15 minutes working collaboratively on this problem.)
Switch roles yet again!
For this exercise, we’ll introduce two new drawing functions:
(rotate deg img)produces the imageimgbut rotateddegdegrees counter-clockwise.(beside/align yalign img1 img2 ...)places the imagesimg1,img2, …, side-by-side as withbeside. However the are aligned relative toyalignwhich can be one of the following strings:"top""bottom""middle""center""baseline"
The images are aligned according to this policy, e.g.,
beside/alignbehaves likebesideif it is passedmiddle.
Coincidentally, above/align also exists with options to align "left", "right", "middle", or "center".
Use these functions to define an image, falling-dominoes, that looks as follows:

Before tackling this problem, I recommend that you experiment with rotate and beside/align to get a feel for how they work.
Try out a few examples in the
Again, use functional decomposition and name the components of your image appropriately with defines.
Exercise 4: Sun Triangles
(B-side: Spend 20 minutes working collaboratively on this problem.)
Switch roles one last time!
Here’s one more function for this exercise:
(overlay img1 img2 ...)places the imagesimg1,img2, …, on top of each other.
In addition, when we specify the fill of an image, e.g., using "solid" as in (square 50 "solid" "red"), we can also specify a number, e.g., (square 50 100 "red").
The number, which must range from 0–255 is interpreted as the degree of transparency of the shape’s color.
0 is interpreted as fully transparent whereas 255 is equivalent to "solid".
Use these functions to define an image, sun-triangles, that looks as follows:

The image is a collection of transparent yellow triangles with black outlines on top of an orange circle.
This one is a bit trickier than the previous ones, and there is a few ways you might approach it. Not all approaches will result in the exact same image, so we aren’t looking for your result to be identical, but it is possible, and we encourage you to think carefully about your decomposition to get that result.
At the very least, you will need to draw yellow triangles with outlines.
To achieve this effect, you should use overlay and two triangles with a combination of "solid" and "outline" fills.
If you are still in class at this point, notify the course staff that you are done and show them your work!
Submitting your lab
Once you have all the exercises in your file, decomposition.rkt, it is now complete!
Finally, one member of your group can upload the completed decomposition.rkt file to Gradescope for this lab.
As in the prior lab, make sure that you upload you work as a group assignment and you include your partner in the submission!
If you get errors from the autograder, you might want to discuss them with one of the class staff.
I would recommend that you use Teams or email to exchange files or portions thereof.