Assignment 3: Drawing Procedures
Due: 10:30 p.m., 3 February 2015
Summary: In this assignment, you will use the functional drawing paradigm to create interesting images by combining procedures.
Purposes: To practice writing procedures, nesting functional calls, and decomposing problems.
Wrapper (Prologue): Individually read through this assignment and make sure that you understand what is required. Then use the form available at http://bit.ly/151hw3pro to indicate (a) how long you think this assignment will take and (b) what you think will be the most challenging aspect of this assignment.
Wrapper (Epilogue): When you are done with the assignment, fill out the form available at http://bit.ly/151hw3epi to indicate (a) how long the assignment took, (b) what the most challenging part of the assignment was, and (c) something important you learned from doing the assignment. If you find that the assignment took much less or much more time than you expected, also include (d) a note as to what might have led to that difference.
Submitting: Email your answer to
<grader-151@cs.grinnell.edu>. The title of your email should have
the form CSC 151.00 Assignment 3: Exploring Drawings and
should contain your answers to all parts of the assignment. Scheme
code should be in the body of the message. You should not attach
any images; I should be able to re-create them from your code.
Warning: So that this assignment is a learning experience for everyone, we may spend class time publicly critiquing your work.
Preliminaries
This week you will explore drawings that use the “drawings as values” approach to make two kinds of drawings: one representational, one non-representational.
Representational Drawings: Smiley Faces
Consider the following Scheme code.
(define sample
  (drawing-hshift
   (drawing-vshift
    (drawing-group
     (drawing-scale
      drawing-unit-circle
      100)
     (drawing-scale
      (drawing-recolor drawing-unit-circle "yellow")
      90)
     (drawing-vshift
      (drawing-hscale
       (drawing-vscale
        drawing-unit-circle
        40)
       60)
      10)
     (drawing-hscale
      (drawing-vscale
       (drawing-recolor drawing-unit-circle "yellow")
       40)
      60)
     (drawing-vshift
      (drawing-group
       (drawing-hshift
        (drawing-group
         (drawing-hscale
          (drawing-vscale
           (drawing-recolor drawing-unit-circle "white")
           15)
          30)
         (drawing-hscale
          (drawing-vscale
           (drawing-recolor drawing-unit-circle "blue")
           15)
          15))
        18)
       (drawing-hshift
        (drawing-group
         (drawing-hscale
          (drawing-vscale
           (drawing-recolor drawing-unit-circle "white")
           15)
          30)
         (drawing-hscale
          (drawing-vscale
           (drawing-recolor drawing-unit-circle "green")
           15)
          15))
        -18))
      -15))
    50)
   50))
Believe it or not, but this code draws a smiley face.

Can you tell what part of the code generates what part of the face?
While the code sucessfully draws a smiley face, it is not very customizable - it draws only one size of smiley face, at only one location, and in only one way. Wouldn't it be much nicer if we could customize the face?
Non-representational Drawings: Putting a Square Peg in a Round Hole
This weeks's second theme may sound a bit more straightforward: “Put a square peg in a round hole.” That is, we start with something like the following image:
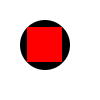
How do we achieve this image? To solve the problem, we'll need to break it down into more manageable pieces.
- You need to be able to create a square drawing of any color, size, and location.
- You need to be able to create a circle drawing of any color, size, and location.
- You need to be able to superimpose drawings, one on top of the other.
- You need to do some geometry to figure out what is the size of the largest square that fits into a circle.
- You need to be able to figure out where to place the square to be sure it's in the center of the circle.
Breaking down problems into manageable pieces is an essential skill computer scientists need. Once the pieces are small enough, you can implement them. And then you put the solution together from all the individual pieces you've solved.
But wait: There's more! Often, in the process of solving a clearly stated problem your imagination will run wild; and you will think of cool and beautiful things that you can do using the pieces you've created to solve the given problem. Then the creative artist in you can come out and express itself. So once you've done all we've specifically asked you to do, the final exercise will give you free rein to produce something beautiful, or at least compelling.
Assignment
Problem 1: Generalized Smiley Faces
As we noted, the smiley code builds only one appearance of smiley face, with a fixed size and location. Wouldn't it be nice to be able to do more? Let's generalize that code!
Write a procedure, smiley, based on the code given above,
that takes some inputs and draws a smiley face based on those inputs.
Minimally, your procedure should have parameters that represent the
the width, height, and center of the smiley face.
But you may consider other possible
inputs: eye color or shape, mouth color or shape, perhaps the size or
relative position of some of the features.
Think carefully about naming the parameters you choose. Write 6Ps documentation so that we can understand how to use your procedure.
Problem 2: Non-Unit Shapes
(a) Write a procedure ( that
creates a drawing of a square with the specified side length whose
top-left corner is at
(square-thing
  col row
side-length color)col,row) and has the
appropriate color.
(b) Write a procedure ( that
creates a drawing of a circle with the specified diameter whose left
margin is at round-thing
col row
diameter color)col, whose top margin is at
row, and which has the specified color.
Problem 3: Pegs in Holes
(a) Write a procedure,
(, which creates a square of the
specified side length and top left corner at
(round-peg-in-square-hole
  col row
  side-length peg-color
hole-color)col,row) with a
circle that is as large as possible inserted. The square and peg should
have the specified colors.

(image-show (drawing->image (round-peg-in-square-hole 20 20 50 "red" "black") 100 100))
(b) Centering the round peg in the square hole is easy, since both have the same width and the same height. But what if we want to center a smaller peg in the hole? We need to shift the peg so that the center matches the center of the hole. How do we do that? We could compute the coordinates of the center of the hole, and the center of the peg, and offset the peg the difference between those.
Write a procedure, (,
that shifts center-peg
hole peg)peg to the center of the hole
and then groups the two together.
(c) We're put a round peg in a square hole. Can we do the reverse? Can we put a square peg in a round hole? Since we know how to center the peg on the hole from the previous procedure, all we should need to know how to do is compute the size of the peg based on the size of the hole. But that's geometry that not all of us want to do. Fortunately, the Interweb tells us that the width of that square is the diameter of the circle divided by the square root of two.
(define square-peg-size
  (lambda (diameter-of-circular-hole)
    (/ diameter-of-circular-hole (sqrt 2))))
Using that procedure, as well as the center-peg
procedure, write a procedure,
(, which creates a circle of the
specified diameter, with left margin at square-peg-in-round-hole
col row
diameter peg-color
hole-color)col,
top margin at row, and with the largest
possible square peg inserted. The square and peg should have the
specified colors.
(image-show (drawing->image (square-peg-in-round-hole 20 20 50 "red" "black") 100 100))
Problem 4: Combining procedures
With some (less than?) basic building blocks in place, you can now show off your creativity and imagination.
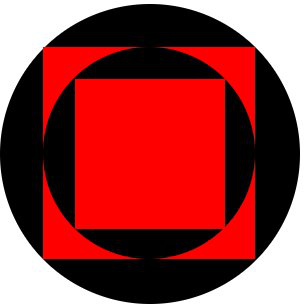
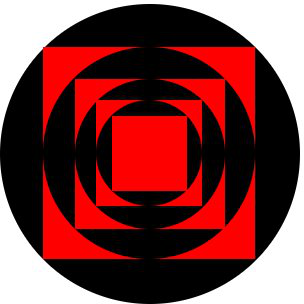
(a) Write code to generate two drawings as shown in the following two images. You may find it useful to write other helper procedures, such as one that creates a round peg in a square hole centered at a particular location.
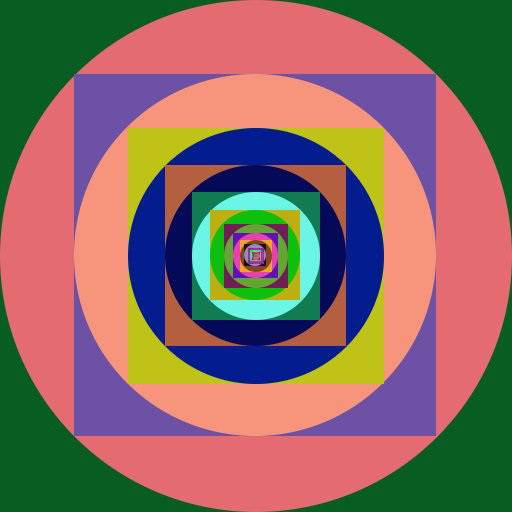
(b) Use the techniques and procedures above, as well as any others you deem useful or interesting, write a program that generates an interesting image by combining at least four peg-in-hole drawings in any geometry or color arrangement you wish. Here is an example; your imagination should show there are many other possibile explorations, including many that include peg-and-hole arrangements other than pure nesting.
Important Evaluation Criteria
We intend to evaluate your assignment on the correctness, elegance, and clarity of your solutions. That is, we will check whether your procedures do what they are intended to do, whether they are reasonably concise, and whether you have chosen a technique that is clear and easy to understand.